DevOps, Day - 5
Advanced Linux Shell Scripting for DevOps Engineers with User management
Shell script to create multiple directories at once

Here $1 is directory_name(d)
$2 is start_directory(1)
$3 is end_directory(90)
After executing this code, we get the output as...
Script to backup all work done till now
Try these steps to back up all your work done till now...
step 1: create a backup script.
Example: I created a
back_up.shscript that includes the current date and time.
I used the built-in-tool calledtar(tape archive) which can create compressed archive files that contain 1 or more files or directories.
Here is the simple script...
step 2: I saved the script in
/home/Krishna/Desktop/d1path
you can save the script in your desired directory.step 3: Assign execute permission for the script using
chmodstep 4: List all the files using
lsand execute the script as./back_up.shstep 5: Now list the contents again using
lsstep 6: Now we can see the back_up file named
backup23-03-28-00-28-49.tar.gz
step 7: Usels -l backup23-03-28-00-28-49.tar.gzHence, you can visit the directory in your system, and check for a back_up file.
Below you can see the flow

Before Back_up

After Back_up

cron & crontab to automate the backup script
what is cron?
cronis a time-based scheduling utility in Linux.It allows you to automate repetitive tasks by running commands or scripts at specified intervals.
cronis an essential tool for system administrators to improve system efficiency and reduce the risk of human error.What is crontab?
crontabis a file that contains a list of commands or scripts scheduled to run automatically usingcronin Linux.The
crontabfile can be edited using thecrontabcommand to specify the schedule, command, and output redirection for each job.crontabis a powerful tool for automating repetitive tasks in Linux and can help improve system efficiency and reduce the risk of manual errors.Commands of crontab
crontab -l [ to show all the current jobs ]
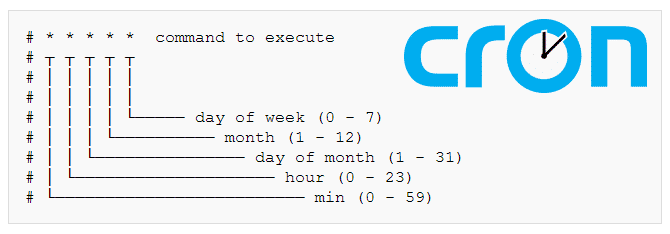
crontab -e [ to edit or add new jobs ]cron job format

Steps to create & use crontabs.
Create any desired file
Example: I created a
task.shscript, which creates a file based on date & time.
step1: type
crontab -l// to list the existing cronjobsstep2: type
crontab -e// select an editor and write your desired scheduling task* * * * * /home/krishna/Desktop/d1/task.shstep3:
sudo service cron status// to check the cronjob status
step4:
sudo service cron start// to start the cronjob
step5: type
ls//now the task will be running
step6: type
crontab -r// to stop the cronjob
User management
User management in Linux is the way we create, modify, and delete user accounts on a Linux system. It helps control user access to system resources and ensures the security and stability of the system. It involves setting up user accounts with appropriate permissions, managing user passwords, and using tools to manage users and groups.
User accounts are used to access a Linux system, and user management involves creating, modifying, and deleting these accounts.
User accounts are associated with a username, password, and unique user ID (UID).
User accounts can be assigned to one or more groups, which determine the user's access to system resources.
User management includes setting permissions for files and directories to control user access to them.
User management is essential for system security, as it allows administrators to restrict access to sensitive information and prevent unauthorized actions by users.
Create 2 users & just display their usernames
step 1:

step 2: After this type password and user1 is created.
step 3: Do the same for another user

step 4: To check, whether both users are added, we use the following command


Finally, we can see both the users added in the last line.
step 5: set a password for the users created newly.
Do the same for all other users created newly, or else the user will not be visible on the login screen.

After setting the password, we can see the user1 on the login screen.

Thank you so much for reading
Follow me at LinkedIn to see interesting posts like this : )
